
How to fix maximum upload and php memory limit issues in WordPress ?

Typical warning message related to upload and memory limit
While working on your WordPress website, you might sometimes see the following type of warning.
- warning post content-length of bytes exceeds the limit...
- The uploaded file exceeds the upload_max_filesize directive in php.ini...
- exceeds the maximum upload size for this site...
- Fatal error: Allowed memory size of 12345678 bytes exhausted (tried to allocate 2345678 bytes) in /home/your-username/public_html/wp-includes/plugin.php on line 1000...
- 413 Error: Request Entity Too Large
- "Are you sure you want to do this ?"
=> Those messages are typically related to your website's server settings for maximum upload size or memory limit.
Check your current system settings
First of all, check your current server memory settings.
In the Customizr or Customizr Pro WordPress themes, we have a feature to let you easily check your system's information. This will be helpful when troubleshooting errors.
- For Customizr Pro Theme, you can find it in WordPress admin -> Appearance -> About Customizr Pro
- For Customizr Theme, you can find it in WordPress admin -> Appearance ->About Customizr
- Scroll down the page and you will see the section - System Information.
File exceeds the upload_max_filesize
You may have encountered the following error message when you are installing your Customizr Pro Theme.
The uploaded file exceeds the upload_max_filesize directive in php.ini
Please see the following screenshot.

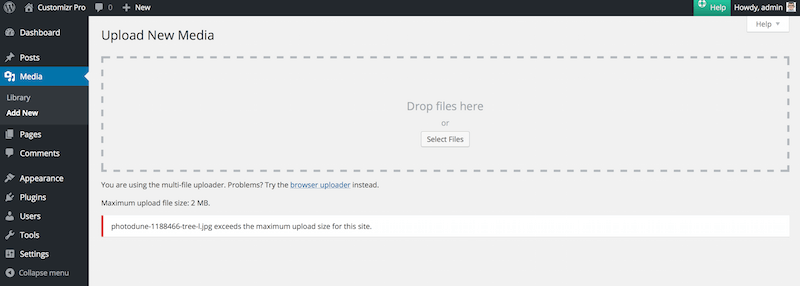
Or the following error when you are uploading an image.
..exceeds the maximum upload size for this site.
Please see the following screenshot.
This happens when your PHP Upload Max Filesize (upload_max_filesize) set in your php.ini file is smaller than the file size of Customizr Pro Theme or the file size of the image that you are trying to upload.
At the time of writing, the file size of Customizr Pro Theme (zip file) is 11.2M.
Look into your System Information for the value of PHP Upload Max Filesize, you will need to increase it to a higher and healthier value.
Solutions
The following are some solutions available to fix your exceeded upload max filesize issue in WordPress.
Contact your Hosting Company
Yes, this is the most preferred way. Contact your hosting company and show them a screenshot of your error, or email them the error message. Ask them to assist by increasing the following values, until you are able to install your theme or upload your image. Your hosting company may have restrictions on these values.
memory_limit
upload_max_size
post_max_size
upload_max_filesize
max_execution_time
max_input_time
Preferably to the following values.
memory_limit = 256M
upload_max_size = 64M
post_max_size = 64M
upload_max_filesize = 64M
max_execution_time = 300
max_input_time = 1000
Editing php.ini File
The php.ini file is the default PHP configuration file. Most of the Shared Hosting Company does not allow access to this file. If you are certain that you have access to php.ini file on your server, you may proceed with the following steps.
- Access it using your FTP program. (how to do use a FTP software with WordPress ?)
- Backup a copy of this file before attempting to edit it.
- Open it and find the following values, one at a time (They are located at different lines within the file)
memory_limit
upload_max_size
post_max_size
upload_max_filesize
max_execution_time
max_input_time
- Preferably, edit them to the following values.
memory_limit = 256M
upload_max_size = 64M
post_max_size = 64M
upload_max_filesize = 64M
max_execution_time = 300
max_input_time = 1000
Using .htaccess file
In WordPress, there is a .htaccess file. WordPress uses this file to manipulate how Apache (server) serves files from its root directory, and subdirectories. Therefore, this file is very important. Do not edit what's originally written in this file. You can add some directives at the end of the file to increase the PHP Upload Max Filesize. Learn more about the htaccess file in WordPress here.
- Use your favorite FTP program to access your WordPress installation.
- Go to the root directory, it's the directory where you can find your wp-config.php file. You should be able to find your .htaccess file.
- Download a copy of it onto your computer to save as backup.
- Open it and added the following into a newline at the end of the file.
php_value memory_limit 256M
php_value upload_max_filesize 64M
php_value post_max_size 64M
php_value max_execution_time 300
php_value max_input_time 1000
- Save your changes and overwrite the .htaccess file on your server.
- Go back to your System Information and check if your values have changed. If not, you should contact your hosting company for assistance in editing these values in your php.ini file.
Fatal Error: Memory Exhaust
If you are experiencing white screen on your site or at intermittent and in different webpages. Set WP_DEBUG to true in your wp-config.php. If you are seeing something similar to the following error message on screen or in your server error log
Fatal error: Allowed memory size of 12345678 bytes exhausted (tried to allocate 2345678 bytes) in /home/your-username/public_html/wp-includes/plugin.php on line 1000
This means your PHP does not have enough memory to work properly.
Solutions
The following are some solutions available to fix your memory exhaust issue.
Contact your Hosting Company
As mentioned above, this is the preferred way. Show them a screenshot of your error or write to them the error message. Ask them to assist in increasing the PHP memory, until you are able to get your site working properly.
Amending your wp-config.php
You can try adding a memory define to WordPress in it's wp-config.php, but this will not work, if your defined memory exceeds your actual server allocated memory.
- Use your ftp program and navigate to your WordPress root directory.
- Find your wp-config.php and download a copy to your computer as backup.
- Open up wp-config.php using your plain text editor or code editor.
- Insert the following code at the end of the file.
define('WP_MEMORY_LIMIT', '256M'); - Save and upload back your wp-config.php to your WordPress installation.
- Clear your browser cache and re-load your website.
- If you are still experiencing error, you should contact your web hosting company for assistance.
Editing php.ini File
If you have access to the php.ini file. you can try the following.
- Using FTP program, navigate to your hosting server and look for the php.ini file.
- Download and keep a backup copy.
- Open it using your code or plain text editor.
- Find the following.
memory_limit
- Change the value to a much higher value. For example.
memory_limit = 256M
- Save and upload back your php.ini to your WordPress installation.
- Clear your browser cache and re-load your website.
- If you are still experiencing error, you should contact your web hosting company for assistance.
Using .htaccess file
- Use your FTP program to access your WordPress installation.
- Go to the root directory, it's the directory where you can find your wp-config.php file. You should be able to find your .htaccess file.
- Download a copy of it onto your computer to save as backup.
- Open it and added the following into a newline at the end of the file.
php_value memory_limit 256
- Save your changes and overwrite the .htaccess file on your server.
- Go back to your System Information and check if your values have changed. If not, you should contact your hosting company for assistance in editing these values in your php.ini file.
That's all for this documentation. Hope it helps!
Further reading
WordPress Codex
- WordPress Backups
- Installing Multiple Blogs requires special wp-config.php
- Troubleshooting Installations
- Securing your Installation
- htaccess for subdirectories
- Using Permalinks
- Changing File Permissions
- UNIX Shell Skills
- Rewrite API
External Resources
- WordPress 'wp-config.php' file Generator
wp core configCLI command- Advanced wp-config.php Tweaks
- Use a single Users table for multiple WordPress sites
- Htaccess on Wikipedia
- Official Apache HTTP Server Tutorial: .htaccess files
- Official Htaccess Directive Quick Reference
- Htaccess Tutorial
- Google PageSpeed for Developers
- Stupid Htaccess Tricks
- Advanced Mod_Rewrite